How did I start using Bitcoin? (Part 1)

Do you ever heard about Bitcoin?  I think you did.
So, what is Bitcoin and can we use it like a real currency such as Dollar, Euro,...? How to get Bitcoin?.... and so on, there maybe a lot of question about Bitcoin. In this article, I'll explain a little about Bitcoin by using the experience I just got 1 month ago.

What is Bitcoin ?

bitcoin logo

Bitcoin, we can split it to 2 words "bit", "coin". The word "bit" is the basic unit of information in computing and digital communications, and the word "coin" means a coin (real money, use to exchange something). So Bitcoin, we can  understand that it is a digital currency (or virtual currency).

What is Flappy Bird? How did it succeed in the games industry?

flappy bird game on android, ios

The important thing to make a game success is "Know what the player want".
So that why everyone in the games industry is trying to figure out what "the people" want, and Flappy Bird is not an exception.
The big players in the AAA sector believe the people want military shooters and open-world games full of the old ultra violence. The indie community believes that what people really want is experimental games with heart and a unique visual sensibility. And puzzle platformers. And roguelikes.
The mobile and social game companies, like Zynga and King, are of the opinion that people want something inoffensive to click on every now and then, but not too often, unless they’ve got cash to spend.
Recently, the people have spoken, and what they’ve said might come as a shock to many of the prognosticators and taste makers across the video game business. It turns out that what the people really want, for the moment at least, is Flappy Bird.

[How to] Symbolic Links (symlinks) on Windows or Linux

Want to easily access folders and files from different folders without maintaining duplicate copies?  Here’s how you can use Symbolic Links to link anything in Windows 7, Vista, XP, and Ubuntu.
symbolic link cmd


So What Are Symbolic Links Anyway?
Symbolic links, otherwise known as symlinks, are basically advanced shortcuts. You can create symbolic links to individual files or folders, and then these will appear like they are stored in the folder with the symbolic link even though the symbolic link only points to their real location.
There are two types of symbolic links: hard and soft. Soft symbolic links work essentially the same as a standard shortcut.  When you open a soft link, you will be redirected to the folder where the files are stored.  However, a hard link makes it appear as though the file or folder actually exists at the location of the symbolic link, and your applications won’t know any different. Thus, hard links are of the most interest in this article.
Why should I use Symbolic Links?
There are many things we use symbolic links for, so here’s some of the top uses we can think of:
  • Sync any folder with Dropbox – say, sync your Pidgin Profile Across Computers
  • Move the settings folder for any program from its original location
  • Store your Music/Pictures/Videos on a second hard drive, but make them show up in your standard Music/Pictures/Videos folders so they’ll be detected my your media programs (Windows 7 Libraries can also be good for this)
  • Keep important files accessible from multiple locations
  • And more!

[How to] Diagnose and fixing the automatic restart computer issue

computer crash restart
Your computer has issue: automatic restart after some minutes? This can be caused by many things, you need to test on both software and hardware to find out the reason and have a solution:

1. Physical HDD error (bad).

Maybe the program you are using attempt to access the file in the bad area make computer restart. In the other hand, Graphic Card, Memory (RAM)
not fastened can cause the same issue, but it often displays the "Blue Screen Of Death" (BSOD).

* Solution: Go to Windows Explorer, select System drive (usually drive C), right click, select Properties, click on Tools tab, click "Check Now" at Error-checking to check drive's errors. You can use softwares from 3rd party to have a professional checking and repairing such as RepairDisk Manager of Raxco.

[TUT] Xử lý máy tính khi bị khởi động liên tục

computer crash restart
Máy tính của bạn bị tình trạng tự động khởi động lại sau một vài phút sử dụng? Trường hợp này có thể xảy ra bởi nhiều nguyên nhân, bạn cần phải thử nghiệm trên phần mềm lẫn phần cứng để có thể tìm ra nguyên nhân và khắc phục:

1. Ổ cứng bị lỗi vật lý (bad).

Khi bị lỗi này, có thể chương trình bạn đang chạy một số tập tin nằm trong vùng bị lỗi thì máy sẽ khởi động lại. Ngoài ra, Card màn hình, RAM gắn lỏng lẻo cũng có thể gây ra tình trạng tương tự, tuy nhiên thường thì chúng sẽ xuất hiện màn hình “xanh” báo lỗi.

* Cách giải quyết: Vào Windows Explorer, chọn ổ đĩa cài đặt hệ thống, thường là ổ C, phải chuột, chọn Properties, chọn thẻ Tools, sau đó click vào Check Now ở phần Error-checking để kiểm tra lỗi đĩa. Có thể sử dụng các phần mềm cao cấp từ các hãng thứ 3 để việc kiểm tra và xử lý được chuyên nghiệp hơn như RepairDisk Manager của Raxco.

[Phần mềm] Tăng tuổi thọ của ổ cứng máy tính trong khi khởi động Windows

Như bạn đã biết, cái gì nhiều quá cũng không tốt, máy tính hoạt động hết công suất sẽ mau hư, con người làm nhiều việc quá sẽ rất mệt, dễ gây đột quỵ. Cho nên ổ cứng máy tính cũng không ngoại lệ, nó sẽ mau chóng bị hư và bạn sẽ mất hết dữ liệu nếu bắt nó làm việc quá sức, nhất là đối với những ổ cứng có số vòng quay cao (RPM - Round Per Minute). Có rất nhiều cách để tăng tuổi thọ cho HDD như là làm giảm vòng quay RPM (nó cũng sẽ làm giảm công suất của ổ cứng),....nhưng mình sẽ giới thiệu cho bạn thêm một cách đó là tăng thời gian chờ của các chương trình chạy khi khởi động Windows.

Tại sao tăng thời gian chờ lại có thể tăng tuổi thọ ổ cứng? Là vì như vầy, khi Windows khởi động, nó sẽ chạy rất nhiều chương trình cùng lúc, điều này khiến cho ổ đĩa của bạn phải đọc/ghi liên tục và làm ổ cứng bị nóng lên nhiều, nó giống như bắt một người làm nhiều việc cùng lúc vậy. Vậy nên Tăng thời gian chờ, chạy các chương trình khởi động một cách tuần tự sẽ giúp HDD của bạn hoạt động được dễ thở hơn vì các chương trình khởi động này sẽ được sắp xếp chạy tuần tự, chờ cho chương trình trước đó được khởi động xong rồi sẽ tiếp tục chạy tiếp chương trình kế.

Trong bài này mình sẽ dùng chương trình Startup Delayer. Chương trình này sẽ giúp bạn quản lý các ứng dụng khởi động cùng Windows và làm chúng chạy theo tuần tự. Bạn có thể tải về bằng link bên dưới:
http://www.mediafire.com/download/7a0u3x1b0k3xba0

Sau khi tải về và cài đặt, chạy ứng dụng Startup Delayer lần đầu tiên, bạn sẽ thấy hộp thoại báo chọn phương thức để chờ, bạn có thể chọn đại rồi cấu hình sau cũng được. Sau khi chạy Startup Delayer, cửa sổ chính chương trình sẽ hiển thị danh sách các ứng dụng khởi động cùng Window.
 
Startup Delayer main


[Software] How to reduce HDD usage on Windows Startup

In case of stress, high usage, everything will be broken or reduce lifetime. So, your HDD will be broken soon if you let's it work too much, especially the high RPM HDD. There are some solution to increase your HDD lifetime such as lower the RPM,....and I will show you the extra way to save your HDD lifetime by increase the waiting time of Startup programs.

Do you know why increase the waiting time of startup programs can save your HDD lifetime? Because when Windows start, it run lot of startup program at once, this cause your drive to read/write at the highest rate so the HDD will hotter and in the highest stress state. Increase the waiting time and load startup application sequentially can help your HDD work with lower stress because startup application will run one after one, waiting for the previous application to load completely.

The program I use in this article is Startup Delayer. This program will manage your Windows startup programs and load it sequentially. You can download by using the link below:
http://www.mediafire.com/download/7a0u3x1b0k3xba0

After install, run the Startup Delayer first time and you will see the dialog to choose how to delays the startup programs, you can select randomly and configure it later. After run the Startup Delayer, main windows will show list of Startup Application of your Windows
Startup Delayer main


[Phần mềm] Thay đổi logo boot Win 8/8.1

8oot Logo Changer Thumb


Bạn có bao giờ thắc mặc là vì sao các phiên bản Windows OEM đi kèm theo máy luôn được nhà sản xuất tùy chỉnh phần logo khi Boot lên Windows khá đẹp không? Người viết thì hơi “ganh tị” vì đều đó.

Hiện tại thì Windows 7 có khá nhiều các phần mềm hỗ trợ người dùng thiết lập thay đổi logo khi boot Windows, tuy nhiên với Windows 8/8.1 thì chưa thấy phần mềm nào thực sự có hiệu quả. Nhưng với 8oot Logo Changer thì bạn nên thử.
Sử dụng 8oot Logo Changer để thay thế logo màn hình khởi động Windows là khá dễ dàng, nhưng tải về và cài đặt mà không chú ý thì bạn sẽ đem vào máy tính hàng tá các phần mềm không mong muốn. Vì thế hãy theo dõi bài viết này.
Sau khi tải về, bạn tiến hành cài đặt bình thường nhưng chú ý đến các cửa sổ thông báo cài đặt các phần mềm không cần thiết, hãy đọc kĩ và nhấn Cancel hoặc đánh dấu vào ô tùy chọn như hình bên dưới. Sau đó bạn sẽ được lựa chọn vị trí chứa tập tin cài đặt chính.

[TUT] Làm sao để xóa laban.vn ra khỏi máy tính, trình duyệt internet của bạn

la bàn.vn
Laban.vn là gì ? 
Vâng laban.vn thực chất chỉ là một danh bạ website, tương tự như một cái la bàn khi bạn vào rừng, thế thôi.
Để thực hiện việc gỡ bỏ laban.vn ra khỏi máy tính, trình duyệt của bạn một cách tận gốc. Bạn cần làm theo các bước sau:
Bước 1
  • Với Windows XP: nhấn tổ hợp phím Windows+R Nhập vào:
%SystemDrive%\Documents and Settings\%username%\Application Data
  • Với Windows Vista/7/8: nhấn tổ hợp phím Windows+R Nhập vào:
%SystemDrive%\Users\%username%\AppData\Roaming
Hoặc đơn giản hơn là:
%appdata%
ENTER....
Sau đó xóa 02 file có biểu tượng La Bàn, xong thì đến bước 2 nhé !
Bước 2: Tiếp theo bạn vào Startup xóa chức năng tự khởi động bằng cách:
Nhấn tổ hợp phím Windows+R để mở hộp thoại Run

Trứng phục sinh, những điều bạn chưa biết về YouTube

Google đã thay đổi phương thức mà bạn chờ load một video clip trên YouTube trong khi YouTube đang load video - bạn chỉ việc nhất mũi tên lên hoặc xuống trên bàn phím trong hầu hết các video clip để giết thời gian trong lúc chờ load. Còn nếu như tốc độ internet của bạn "quá nhanh", bạn không thể thấy hiệu ứng này? Chuyện này sẽ rất đơn giản, vì YouTube có chế độ xem Video 4K, bạn sẽ thấy hiệu ứng load clip.

* Mở một video YouTube bất kỳ và gõ vào 1980. Bạn sẽ phải  bảo vệ cái video và "bắn hạ hết tên lửa trên bầu trời".


youtube defense game


Hướng dẫn chèn nút Like/khung Comment của Facebook vào blog/website/app đơn giản

Như các bạn đã biết, hiện nay có rất nhiều người sử dụng mạng xã hội như là Twitter, Facebook,.... Mọi người chia sẻ mọi thứ trên các mạng xã hội đó, họ càng có nhiều bạn bè, theo dõi thì những gì họ chia sẻ càng được nhiều người biết.
Vậy nên nếu bạn có Diễn Đàn, hoặc website, trong đó có rất nhiều bài viết hay, hữu ít muốn chia sẻ, tại sao bạn lại không chèn các Plugins của mạng xã hội vào Diễn Đàn hoặc website của bạn?

Dưới đây, mình sẽ hướng dẫn các bạn cách chèn các Plugins của Facebook vào site của bạn dùng iframe.

Trước tiên bạn cần có website (phải là website/blog/forum của chính các bạn)

Tiếp theo, chèn các đoạn code dưới đây vào trong phần html của site bạn, nơi mà bạn muốn chúng hiển thị:
 - Nút Like:

How to embed Facebook Like button / Comment box on your website?

Like button, Comment box from facebook

Nowadays, more and more people using social network such as Twitter, Facebook,.... They share almost everything on those social network, the more friend they have, the more views of things they shared can get.
So if you have a forums, or a website, and you have some interesting, useful article, then the reader want to share it to their friend through social network, you have to embed those social network plugin on your site.

Today, I'll show you how to embed the Facebook Plugins to your sites.

First, you must have a website (must be your own website/blog/forum)

Second, you insert the code below into your sites where your want the plugin to display:
 - Like button:

How to extend your Android device's battery using time?

Are you boring of bringing your phone charger all day? With these tip below, you can find out what waste your Android device's battery.

How to find out what eating your Android device's battery?
In Android, you can go to Settings -> Battery and check what is the most battery consuming application. If there has apps that you don't really need it, you should close that app.
Android setting battery consume info


1. Reduce Screen Brightness
The mostly possible is the Screen Brightness of your Android device that consumes most of your device's battery. So, reduce it by go to Settings -> Display -> Brightness and reduce it to minimum (by slide the slider to the left).
You can reduce the Screen Timeout to save battery by go to Settings -> Display -> Screen Timeout and select the minimum value.

2. Turn off Bluetooth, GPS
If you don't have any Bluetooth device connected to your Android phone, then turn off the Bluetooth by go to Settings -> Bluetooth.
The GPS is our favorite feature, we can use it to find the Direction at the strange places or Check-in in some social network such as Facebook. But this service is not necessary, especially when you want to save battery for your device, so turn off this feature by go to Settings -> Location Access.

3. Have a look at Wi-Fi
If you are in the non Wifi area, turn off the Wifi to avoid the device looking for Wifi connection that consume power of your device battery.
But note that when you are in the Wifi area, you should turn off the 3G/4G connection because the using Wifi consume less energy than Data Connection (GPRS/3G/4G).

4. Use the Battery Manager application
There are a lot of application on Google Play Store that can help you optimize your battery. In my opinion, you can use Battery Doctor (FREE). This app can help you turn on/off device features such as Wifi, Data Connection, it also help you to reduce the screen brightness...Or you can use the best choice of Techlicious is Juice Defender. This app has 3 version: FREE, Plus ($1.99) and Ultimate ($6.24).

5. Update your device software/firmware frequently
When you update your device software/firmware, it can be the Bug Fixes, or Improvements that help you device run smoothly and reduce battery consumption.

6. Uninstall unused app
Even when you don't use those app, it can be running in background. So when you don't want to use the app anymore, uninstall it as soon as possible.

7. Don't run too much app
The multitasking of Android is great, but it has a problem: background processes will consumes battery rapidly. So when you finish using an app, turn it off immediately.

Other advices is:
- Don't use animated background
- Limit using the Widget on Home Screen. Using too much Widget may cause your device running slow and draining battery.
- Turn off Vibrate if possible

If you have any suggest, feel free to comment below.

How to remove/block Ads in Yahoo Messenger (Yahoo chat)

If you are an Yahoo's user and you using their Messenger called Yahoo Messenger, maybe you'll see some annoying ads that stealing focus from your current work. You can search the Internet & see many solution like changing Registry, download & run an application,..... but in my opinion, using hosts file of Windows to block these ads working 100%.

Let's talk less & do now:

- Go to Start menu -> Run (or typing directly to the search box for Windows Vista/Windows 7), type the command below to open hosts file & press Enter:
notepad %systemroot%\system32\drivers\etc\hosts
- Add the following lines to the end of the hosts file:
127.0.0.1 insider.msg.yahoo.com (skip this line if you want to see the NEWS from Yahoo)
127.0.0.1 tr.adinterax.com
127.0.0.1 ad.yieldmanager.com
127.0.0.1 content.yieldmanager.edgesuite.net
127.0.0.1 us.adserver.yahoo.com
127.0.0.1 sg.adserver.yahoo.com

- Save the hosts file & Enjoy Ads Free Yahoo Messenger

Please write the source: blogbynoob.blogspot.com
If you want to copy this article. Thanks

How to Open Visual Studio 2010 Project file on Visual Studio 2008

First, you need to convert visual studio 2010 solution file (.sln) to visual studio 2008 solution file (.sln) simply follow these steps:
  1. in .sln file replace:
    1.  "Format Version 11.00" to "Format Version 10.00"
    2. "# Visual Studio 2010" to "# Visual Studio 2008"
  2. in .csproj replace
    1. "ToolsVersion=''4.0''" to "ToolsVersion=''3.5''"
    2. "Microsoft\VisualStudio\v10.0" to "Microsoft\VisualStudio\v9.0"
After that, you can Open the Solution file and work normally.
 
Note: with the WEB Project, in Web.Config file, you should remove the line "<compilation debug="true" targetFramework="4.0" />" to run on Visual Studio 2008

How to install & run 20dollars2surf on Linux

20dollars2surf is a program you can use to make money online doing nothing. But, if you use LINUX, the program can't run or run with error using WINE.

I just found the way to install & run 20dollars2surf cashbar on Linux. I'll show you how.

First, you need to upgrade your WINE to the latest verion (mine is wine-1.2.3).
Download WINETRICKS to /usr/bin (click here for instruction to download WINETRICKS)
Use WINETRICKS to install "vb6 runtime", "ie6" (or ie7, ie8) by type into Terminal these command:

sh winetricks vb6run
sh winetricks ie6

Download the installation file of 20dollars2surf to your disk (ex. /root/cashbar/)
Open Terminal as root, move the current directory to the folder you just download installation file (ex. cd root/cashbar), type wine setup.exe (the installation file name downloaded is setup.exe). And install like normal.

After that, your 20dollars2surf cashbar should run normally without any error. Enjoy!

P/S: After install, you can run 20dollars2surf by using command
wine "C:\Program files\20Dollars2surf\20dollars2surf.exe" > Windows 2008 R2

Java - connect to SQL Server using JDBC ODBC in win 64bit

When I do my School Project (Create an Java App connect to an DB), I found it's can't be done in windows 64bit, so I search the Internet and I found my own way to finish it in Windows 64bit. Just follow these step below.

Step 1
Run the 32-bit odbc driver using
WinKey+R, then copy-paste the below command
C:\Windows\SysWOW64\odbcad32.exe

Step 2
Make a dsn named “SQLDB” or whatever name you want to.

Step 3
Create a new project in eclipse.

Step 4
Change the jre to the java installed inside
C:\Program Files (x86)\java
Use this as “JRE System Library”


Step 5
Use the below code to connect to connect to SQL Server (It's a SQL_Connection class)
import java.sql.*;


public class SQL_Connection {
    public static Connection GetConnection()
    {
        try{
     Class.forName("sun.jdbc.odbc.JdbcOdbcDriver");
     Connection connect=DriverManager.getConnection("jdbc:odbc:SQLDB");
     return connect;
        }
        catch(Exception ex)
        {
            ex.printStackTrace();
            return null;
        }
    }
    public static int ExecuteQueryString(String querystring)
    {
        try{
            Statement st= GetConnection().createStatement();
            return st.executeUpdate(querystring);
        }
        catch(Exception ex)
        {
            ex.printStackTrace();
        }
        return -1;
    }
    public static ResultSet getResultSet(String querystring)
    {
        try{
            Statement st= GetConnection().createStatement();
            ResultSet rs= st.executeQuery(querystring);
            return rs;
        }
        catch(Exception ex)
        {
            //ex.printStackTrace();
            return null;
        }
    }
    public static void Close_Connection(Connection conn)
    {
        try
        {conn.close();}
        catch(Exception ex)
        {}
    }
}
DONE!!!!

How to read emails on mail server ?

First of all there are multiple protocols to retreive mail:
POP3, IMAP, etc...
I suggest you start by familiarizing yourself with the various components that make up an e-mail system.
  • Mail Transfer Agent (Protocol: SMTP)
  • Mail Delivery Agent (Protocols: POP3, IMAP)
  • Mail User Agent (Outlook, Webmail, Thunderbird, your application)
Basically what you are trying to write is a Mail User Agent. A mail user agent has to "fetch" the mails from a Mail Delivery Agent using either POP or IMAP.
This means you will have to learn about these two protocols:
POP3 RFC: http://www.faqs.org/rfcs/rfc1939.html
IMAPv4 RFC: http://james.apache.org/server/rfclist/imap4/rfc2060.txt
Since e-mail communication happens using TCP/IP you will have to learn how to use the classes in the System.Net.Sockets namespace.
Also take a look at the TcpClient class.
Try to understand these concepts first and then I suggest you start out with POP3, this protocol is quite easy. If you have problems then with very specific TcpClient code please update your question or post a new question.
Hope this sets you on the right track.

P/S: I've complete my first program that read emails in Gmail & Download the attachments in selected emails (using VB.NET 2008).

Access data in MS-Access database using Javascript

You know that javascript is a client-side programming language. But if you want to use the local database like MS-Access in your HTML page just using javascript? Here is some code that help you access the data of MS-Access DB in HTML page using JavaScript:

Adding a Record

function AddRecord() {
var adoConn = new ActiveXObject("ADODB.Connection");
var adoRS = new ActiveXObject("ADODB.Recordset");

adoConn.Open("Provider=Microsoft.Jet.OLEDB.4.0;Data Source='/\dbName.mdb'");
adoRS.Open("Select * From tblName", adoConn, 1, 3);

adoRS.AddNew;
adoRS.Fields("FieldName").value = "Quentin";
adoRS.Update;

adoRS.Close();
adoConn.Close();
}

Removing a Record

function DeleteRecord() {
var adoConn = new ActiveXObject("ADODB.Connection");
var adoRS = new ActiveXObject("ADODB.Recordset");

adoConn.Open("Provider=Microsoft.Jet.OLEDB.4.0;Data Source='\\dbName.mdb'");
adoRS.Open("Select * From tblName Where FieldName = 'Quentin'", adoConn, 1, 3);
adoRS.Delete;
adoRS.Delete;

adoRS.Close();
adoConn.Close();
}

Editing a Record

function EditRecord() {
var adoConn = new ActiveXObject("ADODB.Connection");
var adoRS = new ActiveXObject("ADODB.Recordset");

adoConn.Open("Provider=Microsoft.Jet.OLEDB.4.0;Data Source='\\dbName.mdb'");
adoRS.Open("Select * From tblName Where FieldName = 'Quentin'", adoConn, 1, 3);

adoRS.Edit;
adoRS.Fields("FieldName").value = "New Name";
adoRS.Update;

adoRS.Close();
adoConn.Close();
}


Querying data:


var pad = "C:\\My Documents\\data.mdb";
var cn = new ActiveXObject("ADODB.Connection");
var strConn = "Provider=Microsoft.Jet.OLEDB.4.0;Data Source=" + pad;
cn.Open(strConn);
var rs = new ActiveXObject("ADODB.Recordset");
var SQL = "SELECT * FROM datatable";
rs.Open(SQL, cn);
if(!rs.bof) {
rs.MoveFirst();
if(!rs.eof) {
document.write("<p>" + rs.fields(1).value + ", ");
document.write(rs.fields(2).value + ", ");
document.write(rs.fields(3).value + ".</p>");
}
}
else {
document.write("No data found");
};
rs.Close();
cn.Close();

How to Calculating the Perceived Brightness of a Color

When I'm searching on the Internet for the Image Processing Algorithm, I found this useful article, so I copy it to my blog. Thanks the Author of nbdtech.com.


I needed a way to test if a background color is light or dark in order to choose an appropriate text color (black on light colors and white on dark colors), you can find yourself in the same problem if you try to convert an image to grayscale.
I found many approaches that didn’t work well, I’ll describe them and the problems I discovered below – but first – the successful solution.
I finally found a solution that actually works on this web page the formula is:
brightness  =  sqrt( .241 R2 + .691 G2 + .068 B2 )
Or, in C# using the WPF's Color structure System.Windows.Media.Color (the same exact code should also work with the System.Drawing.Color structure used in WinForms and WebForms):
private static int Brightness(Color c)
{
   return (int)Math.Sqrt(
      c.R * c.R * .241 + 
      c.G * c.G * .691 + 
      c.B * c.B * .068);
}
This method will return a number in the rage of 0 (black) to 255 (White) and to set the foreground color based on the Brightness method:
Color textColor = Brightness(backgroundColor) < 130 ? Colors.White : Colors.Black;
I selected cutoff value of 130 by trial and error and it reflects my taste, every value in the rage 128-145 will give acceptable results.
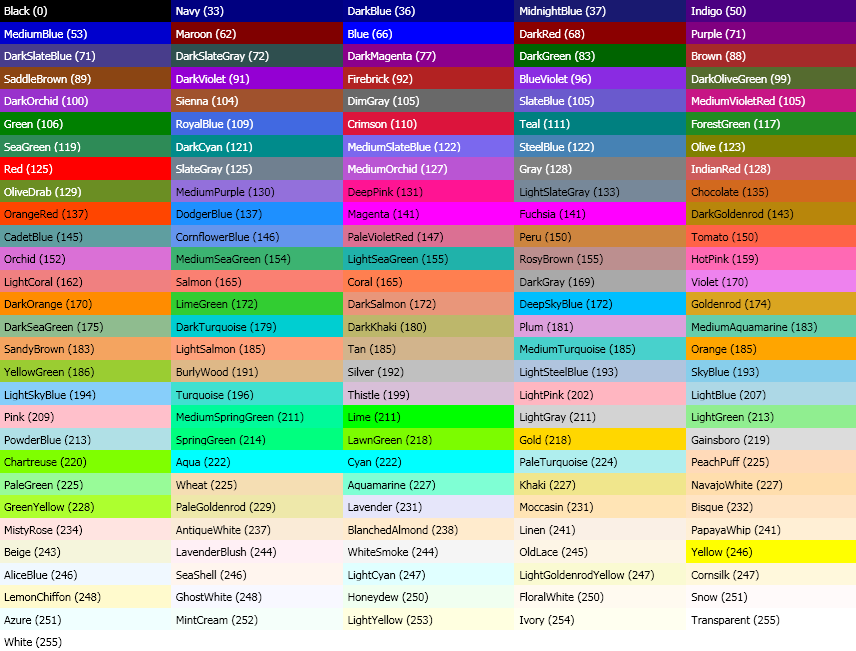
Here is a table of all the named colors in .net 3.0, each with its name in readable text on it based on the code above, the number in parenthesis is the brightness – click on the image to view it in full size (in a new browser window).
Usually, when talking about color theory the range 0-1 is used for each component – so (0,0,0) is black, (1,1,1) is white and (0.5,0.5,0.5) is 50% gray, I’m not using this range, I’m using the 0-255 range used in most programming environments.

Why Not HSL or HSV?

You may think that the luminance (or lightness) component of the HSL color system or the value component of HSV will solve this problem, I did, but I was wrong.
The L component of the HSL and the V component of HSV describe the brightness of a color relative to a base color, if this base color is blue you will get a darker color than if this base color is yellow, HSL and HSV are very useful if you need to create a lighter or darker version of a color but aren’t very useful if you want to know how bright a color is.

The Naïve RGB Algorithm

If RGB 0,0,0 is black and RGB 255,255,255 is white then R+B+G should give us a good approximation of the color brightness, shouldn’t it?
The problem is that some colors are brighter than others, red is brighter then blue and green is brighter then red, maybe we just need to find the right coefficients for them?

The W3C Algorithm

The W3C working draft on accessibility has a formula for the perceived brightness of a color (based on the YIQ color system):
((Red value X 299) + (Green value X 587) + (Blue value X 114)) / 1000
This formula and references to it dominate the search results, probably because the W3C has high search engine rank.
This is better than using HSL, but it tends to give wrong results for many colors, especially shades of yellow.

RGB Color Difference

The W3C also has an algorithm to calculate the difference between colors:
(maximum (Red value 1, Red value 2) - minimum (Red value 1, Red value 2)) + (maximum (Green value 1, Green value 2) - minimum (Green value 1, Green value 2)) + (maximum (Blue value 1, Blue value 2) - minimum (Blue value 1, Blue value 2))
Or, in shorter form:
dR + dG + dB
Where dR, dG and dB are the difference in the Red, Green and Blue component.
If you calculate difference from white and difference from black – and compare them (if difference from black>difference from white then the color is dark) you actually get better results than using the brightness formula, but then you get wrong results for light greens and dark blues (probably because this formula doesn’t take into account the brightness difference of the colors).

3D Distance in RGB Space

You can think of the RGB color space as a cube where each of the 3 colors are axis, in one corner you have black (RGB 0,0,0) and in the opposite corner you have white RGB (255,255,255), so if a color is closer to black it should be darker.
The formula for 3D distance is:
Sqrt(dx2+dy2+dz2)
Where dx, dy and dz are the difference on the x, y and z axis.
This algorithm also gives mixed results because it doesn’t take into account the fact that some colors look brighter than others -  and that’s gets us back to …

Weighted Distance in 3D RGB Space (or the HSP algorithm)

If you scroll up to the beginning of this post and look at the brightness formula there you will see it’s just like the 3D distance formula except it gives different weight to each axis.
So now we finished our tour to color brightness land we have a good formula for calculating perceived brightness and (if my explanations where clear) we can actually understand why it works.

Source: nbdtech.com

Sponsors