[How to] Block specific Websites with GeckoFX in C#

Have you ever heard of WebBrowser in .NET Application? If yes, then you know how bad is the Default WebBrowser in .NET. In Internet we can find many alternative for the .NET's Default WebBrowser. There are many, such as CefSharp or GeckoFX,....

In this post I will introduce to you GeckoFX and I will show you how to build your first Gecko Browser program with the Blocking Feature.

GeckoFX is the open source component to embedding the Gecko rendering engine from Mozilla Firefox to .NET application.

To download GeckoFX-Source (current version is GeckoFX-45) go to the GeckoFX BitBucket Wikipage https://bitbucket.org/geckofx/geckofx-45.0/wiki/Home

Or we can use "NuGet-Package Manager" to install GeckoFX-45 to your project as the picture below:

NuGet install GeckoFX


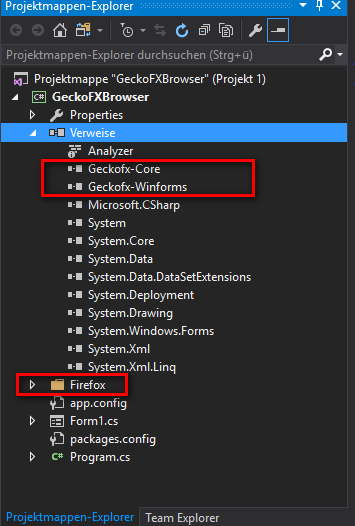
After that we'll see the Firefox folder and the 2 new Dependencies in the Project Explorer Window:

Firefox GeckoFX Project explorer

First we have to declare Gecko namespace
using Gecko;

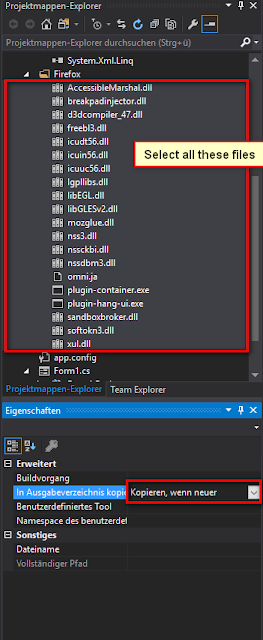
Just one more setting, select all files from the Firefox folder and select "Always copy" or "Copy when newer" to "Output folder" as below:

Copy dll files to Output folder


Now we can use the GeckoWebbrowser. Just declare the GeckoWebBrowser variable and load all the needed dll files as the picture below:

Init GeckoFX - Declare GeckoWebBrowser variable


What is function InitBrowser? It a function to configure the WebBrowser and to add the Browser into the Form

Configure GeckoWebBrowser


The important Thing to use Blocking feature of GeckoFX is we have to enable HttpActivityObserver, so we set here UseHttpActivityObserver = true.

After UseHttpActivityObserver is enabled, we need to add a Event-Handler, in this case is ObserveHttpModifyRequest-Event from GeckoWebBrowser.

When the WebBrowser send any request to any URL the event ObserveHttpModifyRequest will be fired. We can get the URL of the request by using variable request and convert it to string with request.Uri.ToString(). In this example, I block all the Request that contain "google.com" in the URL.

Here is the code:
        public GeckoWebBrowser webBrowser;
        public Form1()
        {
            InitializeComponent();
            Xpcom.Initialize("Firefox"); // Init all Gecko DLL files in the Firefox folder inside the Project
            InitBrowser();
        }

        // Init Browser
        void InitBrowser()
        {
            webBrowser = new GeckoWebBrowser { Dock = DockStyle.Fill, // Fill all the Form
                UseHttpActivityObserver = true // This is to enable HttpActivityObserver
            };
            webBrowser.ObserveHttpModifyRequest += (obj, request) => {
                if (!request.Uri.ToString().Contains("google.com")) // if the request URL contains string "google.com"
                {
                    request.Cancel = true; // Cancel the request to the URL
                }
            };
            this.Controls.Add(webBrowser);
        }
When you have any question, feel free to leave a commend, I will answer as soon as I can. Have fun coding!

P/S: In this tutorial I installed and use GeckoFX-45 32 bit, so when build the project I have to choose x32 Platform (It will give error when you try to compile to 64 bit Application, in case you want to build 64 bit Application, just install GeckoFx45.64 in the NuGet-Package Manager)

[How to] Remove locked file or folder that cause Error

You want to move, rename or delete a file in your hard drive but you can’t because, according to your lovely Windows operating system, the file is "currently being used by another person or program".
error deleting file or folder

You will restart the computer? Maybe, but maybe it can't be done by that way.

There is a solution, that is Unlocker tool. You can download using one of the links below [MediaFire]:

[TUT] Fix lỗi không thể xóa được file hoặc folder

Bạn có thể đã gặp tình huống trớ trêu như hình dưới khi cố gắng di chuyển, xóa file hoặc thư mục (folder) nào đó:
error deleting file or folder

Gặp tình huống vậy bạn sẽ khởi động lại máy ư? Có thể, nhưng cũng có thể khởi động lại cũng không khắc phục được. Vậy không lẽ lại bó tay?

Có một cách, đó là dùng công cụ Unlocker. Các bạn có thể down về bằng 1 trong 2 link [MediaFire] bên dưới:

[How to] Fix the Shorcut virus .lnk that hide data

Do you ever see a folder but have a shortcut icon (an icon has shortcut arrow at the corner)? See those picture below:
virus shortcut lnk

[TUT] Khắc phục lỗi virut chuyển folder thành Shortcut .lnk, làm ẩn dữ liệu

Bạn đã từng gặp trường hợp một folder lại có biểu tượng shortcut (biểu tượng có dấu mũi tên ở góc trái)? Hình minh họa:
virus shortcut lnk

[How to] Diagnose and fixing the automatic restart computer issue

computer crash restart
Your computer has issue: automatic restart after some minutes? This can be caused by many things, you need to test on both software and hardware to find out the reason and have a solution:

1. Physical HDD error (bad).

Maybe the program you are using attempt to access the file in the bad area make computer restart. In the other hand, Graphic Card, Memory (RAM)
not fastened can cause the same issue, but it often displays the "Blue Screen Of Death" (BSOD).

* Solution: Go to Windows Explorer, select System drive (usually drive C), right click, select Properties, click on Tools tab, click "Check Now" at Error-checking to check drive's errors. You can use softwares from 3rd party to have a professional checking and repairing such as RepairDisk Manager of Raxco.

[TUT] Xử lý máy tính khi bị khởi động liên tục

computer crash restart
Máy tính của bạn bị tình trạng tự động khởi động lại sau một vài phút sử dụng? Trường hợp này có thể xảy ra bởi nhiều nguyên nhân, bạn cần phải thử nghiệm trên phần mềm lẫn phần cứng để có thể tìm ra nguyên nhân và khắc phục:

1. Ổ cứng bị lỗi vật lý (bad).

Khi bị lỗi này, có thể chương trình bạn đang chạy một số tập tin nằm trong vùng bị lỗi thì máy sẽ khởi động lại. Ngoài ra, Card màn hình, RAM gắn lỏng lẻo cũng có thể gây ra tình trạng tương tự, tuy nhiên thường thì chúng sẽ xuất hiện màn hình “xanh” báo lỗi.

* Cách giải quyết: Vào Windows Explorer, chọn ổ đĩa cài đặt hệ thống, thường là ổ C, phải chuột, chọn Properties, chọn thẻ Tools, sau đó click vào Check Now ở phần Error-checking để kiểm tra lỗi đĩa. Có thể sử dụng các phần mềm cao cấp từ các hãng thứ 3 để việc kiểm tra và xử lý được chuyên nghiệp hơn như RepairDisk Manager của Raxco.

How to turn your computer to a Wifi hotspot in Win Vista/Win 7/Win 8

If you have a computer (or a laptop), you want to share your internet connection via Wifi? You may use program such as Connectify, but this program is not FREE (you still use it FREE but with limited features).
In the other hand, you can turn your computer to a Wifi hotspot with those simple step below.

Requirements: Supported Wireless card, using Win Vista and above.

Step 1:
Open command prompt:
  • Go to Start menu, type cmd, right click on cmd.exe then click Run As Administrator (for Win 7)
  • Press Windows key(the key has Windows Flags) + X and Press A to run Command Prompt as Admin(for Win 8)
Step 2:
Check if your wireless card support hostednetwork:
Type in the command prompt windows and press Enter:
netsh wlan show drivers
If your wireless card supported hostednetwork, you will see the line in the red circle below
check wifi hotspot hostednetwork supported

Step 3:
Configure Wifi hotspot:

[TUT] Biến máy tính thành điểm phát sóng Wifi Win Vista/Win 7/Win 8

Giả sử bạn có một kết nối internet như 3G, bạn muốn chia sẻ nó cho người khác dùng (có thể là người trong nhà hoặc bạn bè), bạn sẽ làm như thế nào nếu không có thiết bị phát Wifi nào khác ngoại trừ thiết bị Wifi có sẵn trong laptop hoặc máy để bàn? Có thể bạn sẽ nhờ tới những phần mềm như Connectify, nhưng những phần mềm này phải mất phí (bạn vẫn có thể dùng FREE nhưng nhiều tính năng bị hạn chế, đặc biệt là tính năng đặt tên Wifi tùy thích).
Tuy nhiên, vẫn có cách để bạn có thể tự biến laptop/máy tính để bàn của mình thành một điểm phát sóng Wifi, dưới đây mình sẽ hướng dẫn cụ thể từng bước.

Yêu cầu: máy tính phải có card Wifi và sử dụng Win Vista trở lên.

Bước 1:
Mở command prompt lên bằng cách:
  • Vào Start menu, gõ cmd, nhấp chuột phải vào biểu tượng cmd.exe chọn Run As Administrator (Đối với Win 7)
  • Bấm tổ hợp phím Windows (phím có biểu tượng lá cờ Windows) + X và bấm A để chạy Command Prompt bằng quyền Admin(Đối với Win 8)
Bước 2:
Kiểm tra xem card wifi của bạn có hỗ trợ phát sóng Wifi hay không:
Gõ vào khung command prompt và bấm Enter:
netsh wlan show drivers
Nếu card wifi của bạn có hỗ trợ thì sẽ có dòng được khoanh màu đỏ như hình dưới
check wifi hotspot hostednetwork supported

Bước 3:
Thiết lập điểm phát sóng Wifi:

[TUT] Làm sao để xóa laban.vn ra khỏi máy tính, trình duyệt internet của bạn

la bàn.vn
Laban.vn là gì ? 
Vâng laban.vn thực chất chỉ là một danh bạ website, tương tự như một cái la bàn khi bạn vào rừng, thế thôi.
Để thực hiện việc gỡ bỏ laban.vn ra khỏi máy tính, trình duyệt của bạn một cách tận gốc. Bạn cần làm theo các bước sau:
Bước 1
  • Với Windows XP: nhấn tổ hợp phím Windows+R Nhập vào:
%SystemDrive%\Documents and Settings\%username%\Application Data
  • Với Windows Vista/7/8: nhấn tổ hợp phím Windows+R Nhập vào:
%SystemDrive%\Users\%username%\AppData\Roaming
Hoặc đơn giản hơn là:
%appdata%
ENTER....
Sau đó xóa 02 file có biểu tượng La Bàn, xong thì đến bước 2 nhé !
Bước 2: Tiếp theo bạn vào Startup xóa chức năng tự khởi động bằng cách:
Nhấn tổ hợp phím Windows+R để mở hộp thoại Run

Trứng phục sinh, những điều bạn chưa biết về YouTube

Google đã thay đổi phương thức mà bạn chờ load một video clip trên YouTube trong khi YouTube đang load video - bạn chỉ việc nhất mũi tên lên hoặc xuống trên bàn phím trong hầu hết các video clip để giết thời gian trong lúc chờ load. Còn nếu như tốc độ internet của bạn "quá nhanh", bạn không thể thấy hiệu ứng này? Chuyện này sẽ rất đơn giản, vì YouTube có chế độ xem Video 4K, bạn sẽ thấy hiệu ứng load clip.

* Mở một video YouTube bất kỳ và gõ vào 1980. Bạn sẽ phải  bảo vệ cái video và "bắn hạ hết tên lửa trên bầu trời".


youtube defense game


Hướng dẫn chèn nút Like/khung Comment của Facebook vào blog/website/app đơn giản

Như các bạn đã biết, hiện nay có rất nhiều người sử dụng mạng xã hội như là Twitter, Facebook,.... Mọi người chia sẻ mọi thứ trên các mạng xã hội đó, họ càng có nhiều bạn bè, theo dõi thì những gì họ chia sẻ càng được nhiều người biết.
Vậy nên nếu bạn có Diễn Đàn, hoặc website, trong đó có rất nhiều bài viết hay, hữu ít muốn chia sẻ, tại sao bạn lại không chèn các Plugins của mạng xã hội vào Diễn Đàn hoặc website của bạn?

Dưới đây, mình sẽ hướng dẫn các bạn cách chèn các Plugins của Facebook vào site của bạn dùng iframe.

Trước tiên bạn cần có website (phải là website/blog/forum của chính các bạn)

Tiếp theo, chèn các đoạn code dưới đây vào trong phần html của site bạn, nơi mà bạn muốn chúng hiển thị:
 - Nút Like:

Sponsors